Measured diagram
How does an onlay meet the tooth where a cusp broke off?
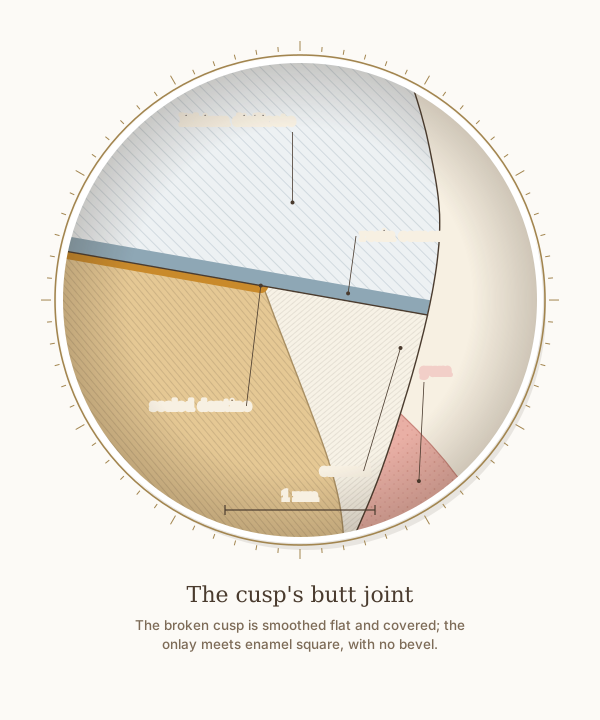
A close-up of the tongue-side edge of the onlay in the step-by-step figure, with a 1 mm scale. The broken surface is smoothed flat and ends square against the tooth's outer surface, on enamel and above the gum, with no bevel. Under the resin cement, the dentine that the smoothing exposed was sealed the day it was cut.
What the drawing is measured from
- In 30 upper premolars restored with milled lithium disilicate overlays, a butt-joint preparation fitted as closely as a hollow chamfer, with marginal gaps of about 17 and 16 micrometres after cementation, and significantly more closely than a conventional box design, about 34 micrometres. Athab Hasan and Mohammed-Hussain Abdul-Ameer 2023, The Saudi Dental Journal, laboratory study. DOI
- In a laboratory study on 40 lower molars, the mean marginal gaps of the groups ranged from about 61 to 99 micrometres, larger for lithium disilicate than for a hybrid ceramic and larger where a cusp was covered, all within the range accepted clinically. Attia and Salama 2024, The International Journal of Prosthodontics. DOI
- Immediate dentine sealing means applying and curing a dentine bonding agent on the freshly cut dentine straight after the preparation, before the impression or scan; a review of more than 30 articles found that it appears to give better bond strength, fewer gaps, less bacterial leakage and less sensitivity. Magne 2005, Journal of Esthetic and Restorative Dentistry, review. DOI
- In 160 men followed for 26 years, filling margins placed below the gum line were detrimental to gum and periodontal health; the extra loss of attachment began slowly and could be detected 1 to 3 years after the restorations were placed. Schätzle et al. 2001, Journal of Clinical Periodontology. DOI
- Drawn as Dr. Khalid restores a broken cusp: the break smoothed flat to a butt joint with no bevel, here on enamel above the gum; the freshly cut dentine sealed straight away; lithium disilicate, sandblasted, etched with hydrofluoric acid, cleaned with phosphoric acid and primed with silane, bonded with resin cement under rubber dam. The cement and the sealing are drawn 0.1 mm thick, as in the step-by-step figure; their thickness is representative, not measured.
Use this diagram
Free to use, including commercially, with credit.
This diagram is published under CC BY 4.0. You may reproduce it in articles, teaching material, presentations and patient information, print or online, without asking. The one condition is that you credit Dr. Khalid Aletaibi and link back to this page.
It is published this way on purpose. The measurement in this drawing is not something the people selling the treatment tend to publish, so it is more useful spread than kept.
Credit line
The cusp's butt joint. Dr. Khalid Aletaibi, CC BY 4.0. https://khalidaletaibi.com/en/diagrams/onlay-butt
HTML embed
<figure>
  <img src="https://khalidaletaibi.com/figures/onlay-butt-en.svg" alt="The cusp's butt joint" width="100%">
  <figcaption>
    The cusp's butt joint. <a href="https://khalidaletaibi.com/en/diagrams/onlay-butt">Dr. Khalid Aletaibi</a>,
    <a href="https://creativecommons.org/licenses/by/4.0/">CC BY 4.0</a>
  </figcaption>
</figure>